This document introduces how to manage the quick login instance list and how to log in to DMC without a password using the quick login method.
The main features of the quick login page include adding database instances, viewing the instance list, one-click login to the SQL window, modifying the username and password for database instance access, and viewing instance user permissions.
Prerequisites
An instance can be added multiple times on the quick login page using different database accounts, but each instance can only be added once using per database account.
After the same instance is enabled for management control, its status on the quick login page will be disabled, and only the delete operation is supported. For operations on adding instances to data sources and enabling management control, see Data Source Management.
Prerequisites
The sub-account has the necessary access permissions for DMC-related feature pages. For details and operations, see DMC User Permission Settings. The root account has full permissions by default.
The account and password for logging in to the database via DMC have been obtained.
Note:
The default account for Tencent Cloud VectorDB is root, and the login password can be directly obtained from the console. The retrieval method is as follows:
2. In the left sidebar, select Basic Development > Quick Log-in.
3. At the top of the page, click Add Database.
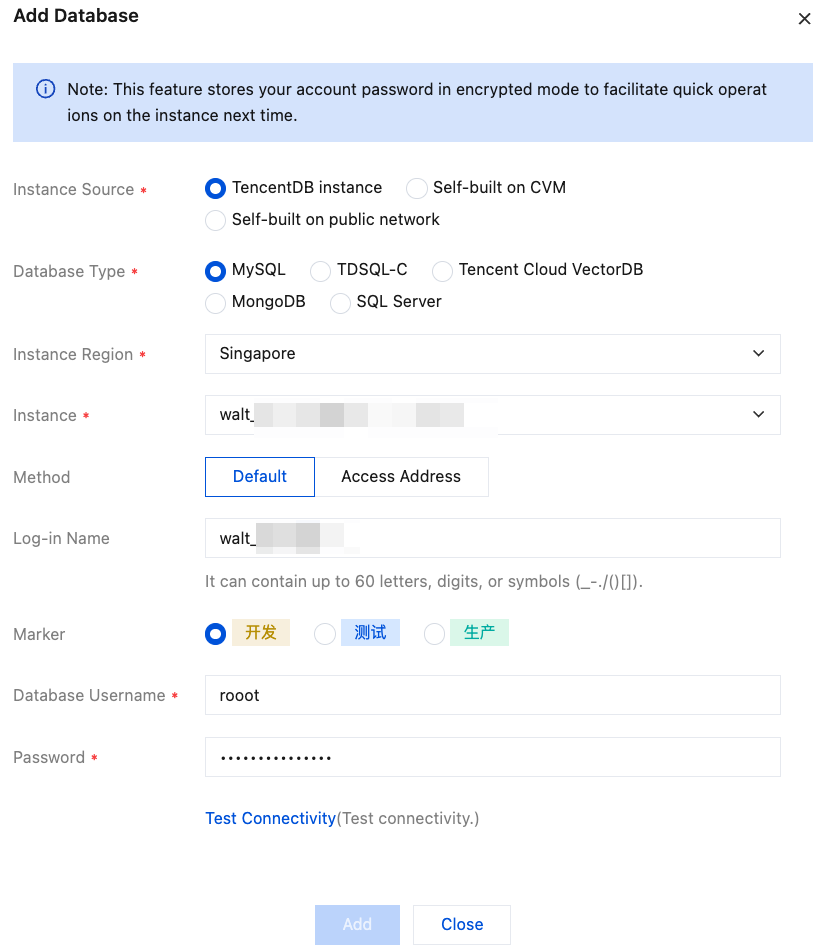
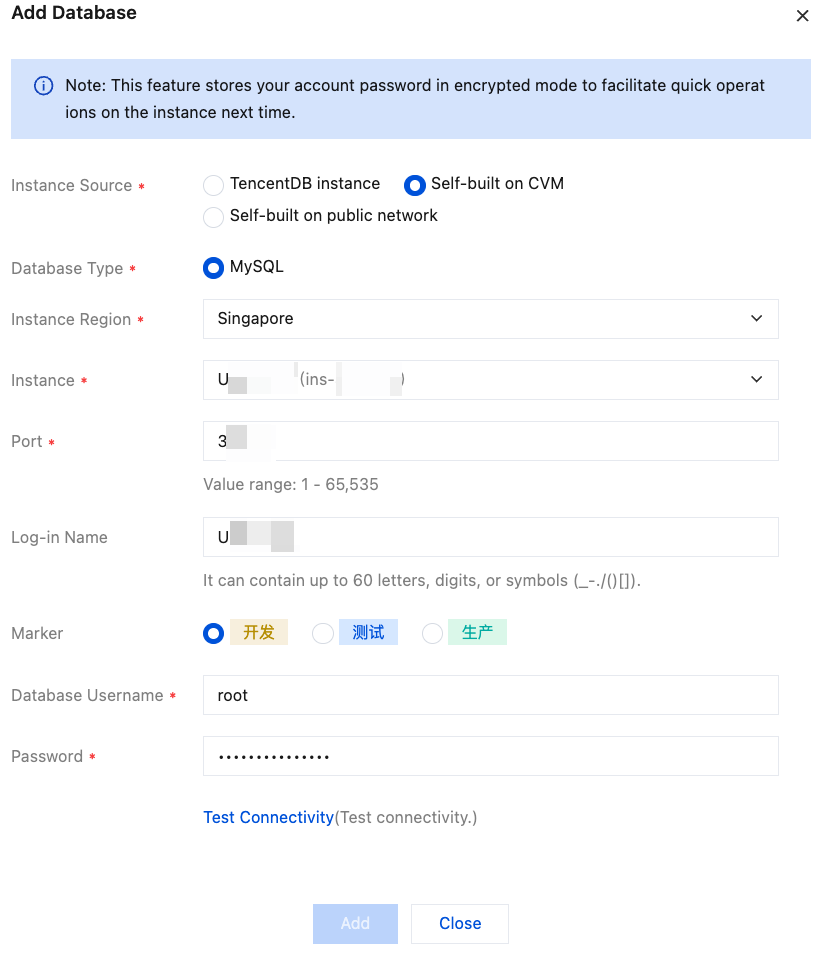
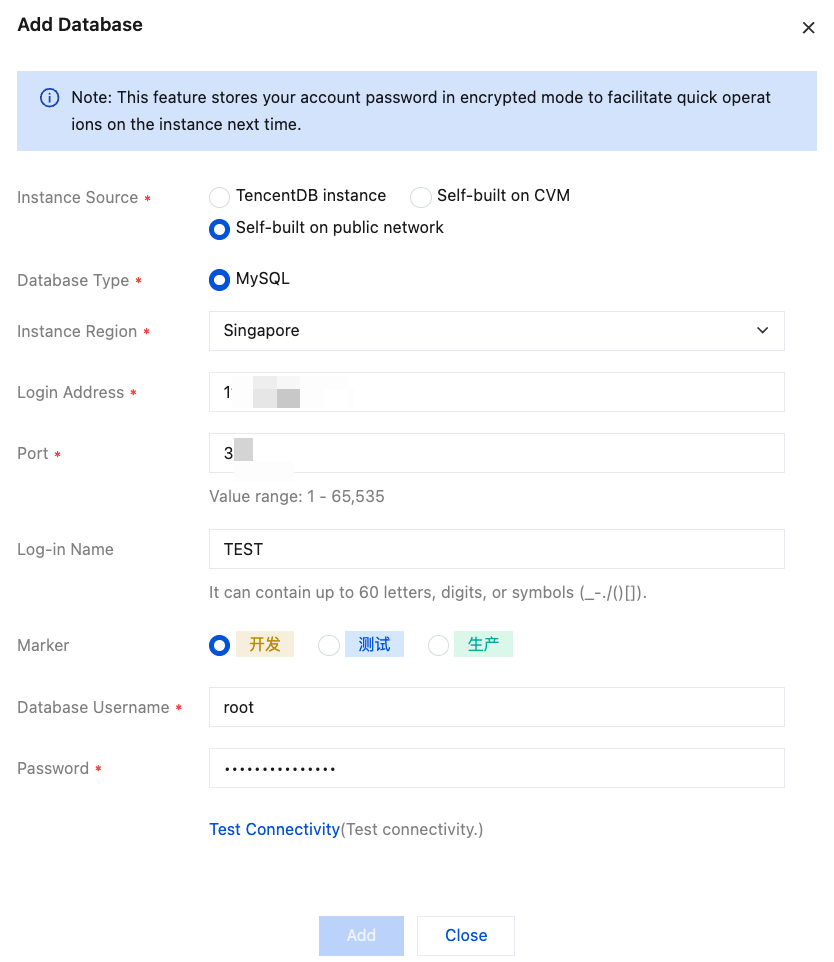
4. In the pop-up dialog box, enter the parameter information as prompted on the interface. Specific parameter descriptions are shown in the table below.
Instance Source: TencentDB Instance
Instance Source: CVM Self-Built Instance
Instance Source: Public Network Self-Built Instance
Parameter
Required
Description
Cloud Instance
CVM Self-Built Instance
Public Network Self-Built Instance
Instance Source
Yes
Supports TencentDB instance, CVM self-built instances, and public network self-built instances. Different instance types require different parameter configurations.
TencentDB instance: The source database is a Tencent Cloud database instance.
CVM self-built instance: The source database is a self-built database on CVM.
Public network self-built instance: The source database is a self-built database on a local server or a third-party cloud vendor’s database.
✓
✓
✓
Database Type
Yes
You can select a database type that is supported by DMC. For details, see Supported Databases.
✓
✓
✓
Instance Region
Yes
Select the region where the instance is located.
✓
✓
✓
Instance
Yes
Select the source instance name for which you want to create a quick login.
✓
✓
×
Method
No
Access method, including default and access address.
Default: Represents the read-write address of the primary instance.
Access address: Select the instance access address, including the primary instance address, read-only instance address, read-only node address, read-only group address, and database proxy address.
This applies only to the MySQL database type.
✓
×
×
Cluster
Yes
Select the cluster name for creating a quick login. This applies only to the TDSQL-C database type.
✓
×
×
Access Address
No
Select the instance access address. This applies only to the TDSQL-C database type.
Customize the login name displayed in the quick login list.
Only supports numbers, uppercase and lowercase English letters, Chinese characters, and special characters _ - . / ( ) [ ], with a length of less than 60.
Example value: test
✓
✓
✓
Marker
No
Select the tag to which the instance belongs. To create a marker, see Marker Management.
✓
✓
✓
Database Username
Yes
The username for accessing the database instance.
Example value: root
✓
✓
✓
Password
Yes
The password corresponding to the username for accessing the database instance.
Example value: azj****24!
✓
✓
✓
5. Click Test Connectivity.
If the connectivity test fails, check the configuration parameters, make necessary modifications, and test again.
6. After the test passes, click Add.
The instance list on the Quick Log-In page will display the added instances available for quick login.
View account permissions: Click More > View Permissions.
Modify instance tag: Click More > Modify Markers, then click OK after making the changes.
Delete quick login: Click More > Delete, and then click Delete.
Note:
Instances that have been added to the data source do not support editing or modifying tags on the quick login page. To perform these operations, go to the Data Source page for modifications.
One-Click Login and Entering the SQL Window
After successfully adding a database instance on the Quick Log In page, you can log in to the database instance without a password in one click from the quick login list.
2. In the left sidebar, select Basic Development > Quick Log-in.
3. In the quick login list, locate the instance to log in to, and click Log In in the Operation column of the corresponding instance.
You will be redirected to the SQL Window page, where you can perform SQL-related operations.
Modifying the Username and Password for Database Instance Access
When the username and password for accessing the database change, you can modify them on the quick login page. After modification, you can continue using quick login for the instance.