Configuring WAF and Anti-DDoS EIP for Coordinated Protection
ダウンロード
フォーカスモード
フォントサイズ
Anti-DDoS EIPs provide Tbps-level DDoS protection and can effectively defend against large-scale traffic attacks. WAF supports linkage configurations between SaaS WAF and Anti-DDoS EIPs, and among private network CLB, WAF, and Anti-DDoS EIPs, helping customers achieve deep integration of network-layer and application-layer security capabilities.
Prerequisites
You have purchased a Tencent Cloud WAF instance. For details, go to the WAF purchase page.
You have purchased Anti-DDoS Pro and a bandwidth package, and created an Anti-DDoS EIP. For details, see Anti-DDoS EIP Creation Guide. If you cannot bind WAF, contact the technical support team at Contact Us.
Configuring SaaS WAF and Anti-DDoS EIP for Coordinated Protection
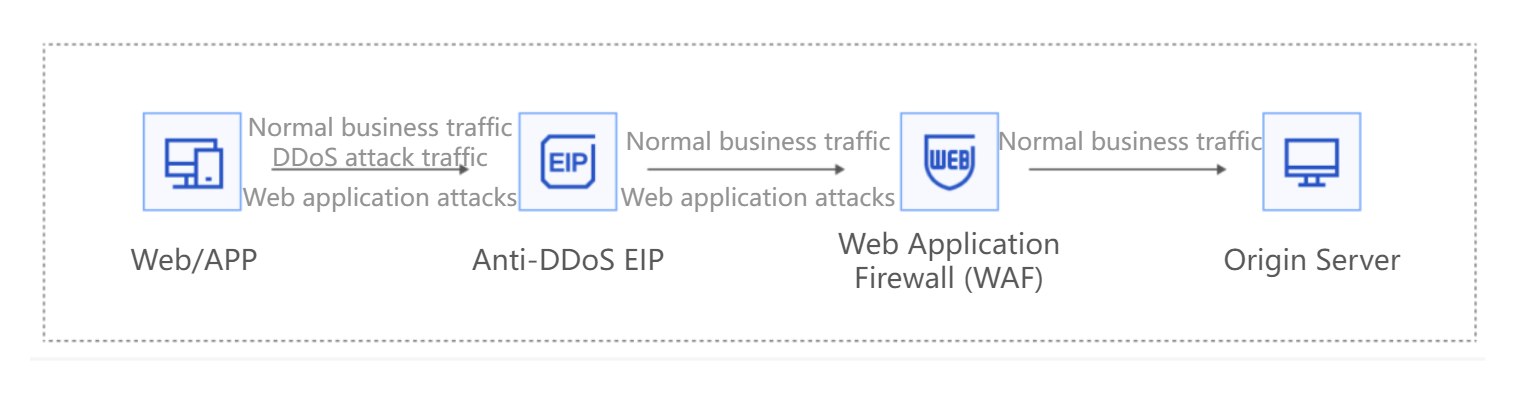
If your business already uses EIPs and you want to enable both Anti-DDoS and SaaS WAF protection, refer to this solution. In this mode, client traffic is first scrubbed by Anti-DDoS EIPs to mitigate large-scale DDoS attacks, then forwarded to SaaS WAF to detect and filter Web attack traffic, and finally only legitimate traffic is forwarded to the origin server.
Step 1: Configuring WAF
First, you need to add the domain name to WAF. For detailed operations, see Adding a Domain Name to SaaS WAF.
Step 2: Activating Anti-DDoS EIP
Go to the public IP address console to apply for an EIP and bind the purchased Enterprise Edition Anti-DDoS Pro plan. For EIP application operations, see Applying for an EIP.
Step 3: Binding Anti-DDoS EIP to WAF
After activating Anti-DDoS EIP, you need to bind WAF in the public IP address console so that the Anti-DDoS EIP can obtain the WAF instance with an assigned VIP.
1. Log in to the public IP address console.
2. At the top of the public IP address page, select the region of the Anti-DDoS EIP that you want to bind to cloud resources. In the operation column of the corresponding Anti-DDoS EIP, choose More > Bind.
Note:
If the EIP has been bound to cloud resources, unbind it first. For example, you need to replace the EIP of a faulty CVM instance with a healthy CVM instance.
3. In the pop-up Bind Resource window, select WAF, choose a WAF instance below, and click OK.
4. In the pop-up "Confirm Binding" dialog box, click OK to complete the binding with the WAF instance. For more operations, see EIP Binding to Cloud Resources.
5. After binding the WAF instance in the EIP console, you can view related information in the WAF console Instance Management:
If an instance is bound to an Anti-DDoS EIP, the Anti-DDoS status is displayed as "Anti-DDoS EIP Bound" below the instance type.
Hover the mouse here to view the high-defense EIP address. Click view details to redirect to the EIP console.
After the Anti-DDoS EIP is bound, the bandwidth is borne by the EIP. The bandwidth specification limit is not displayed. The service bandwidth on the VIP is normally counted in the background, and the bandwidth range takes effect normally. Unbinding is supported via the EIP console. After the EIP is unbound, the bandwidth is displayed automatically.

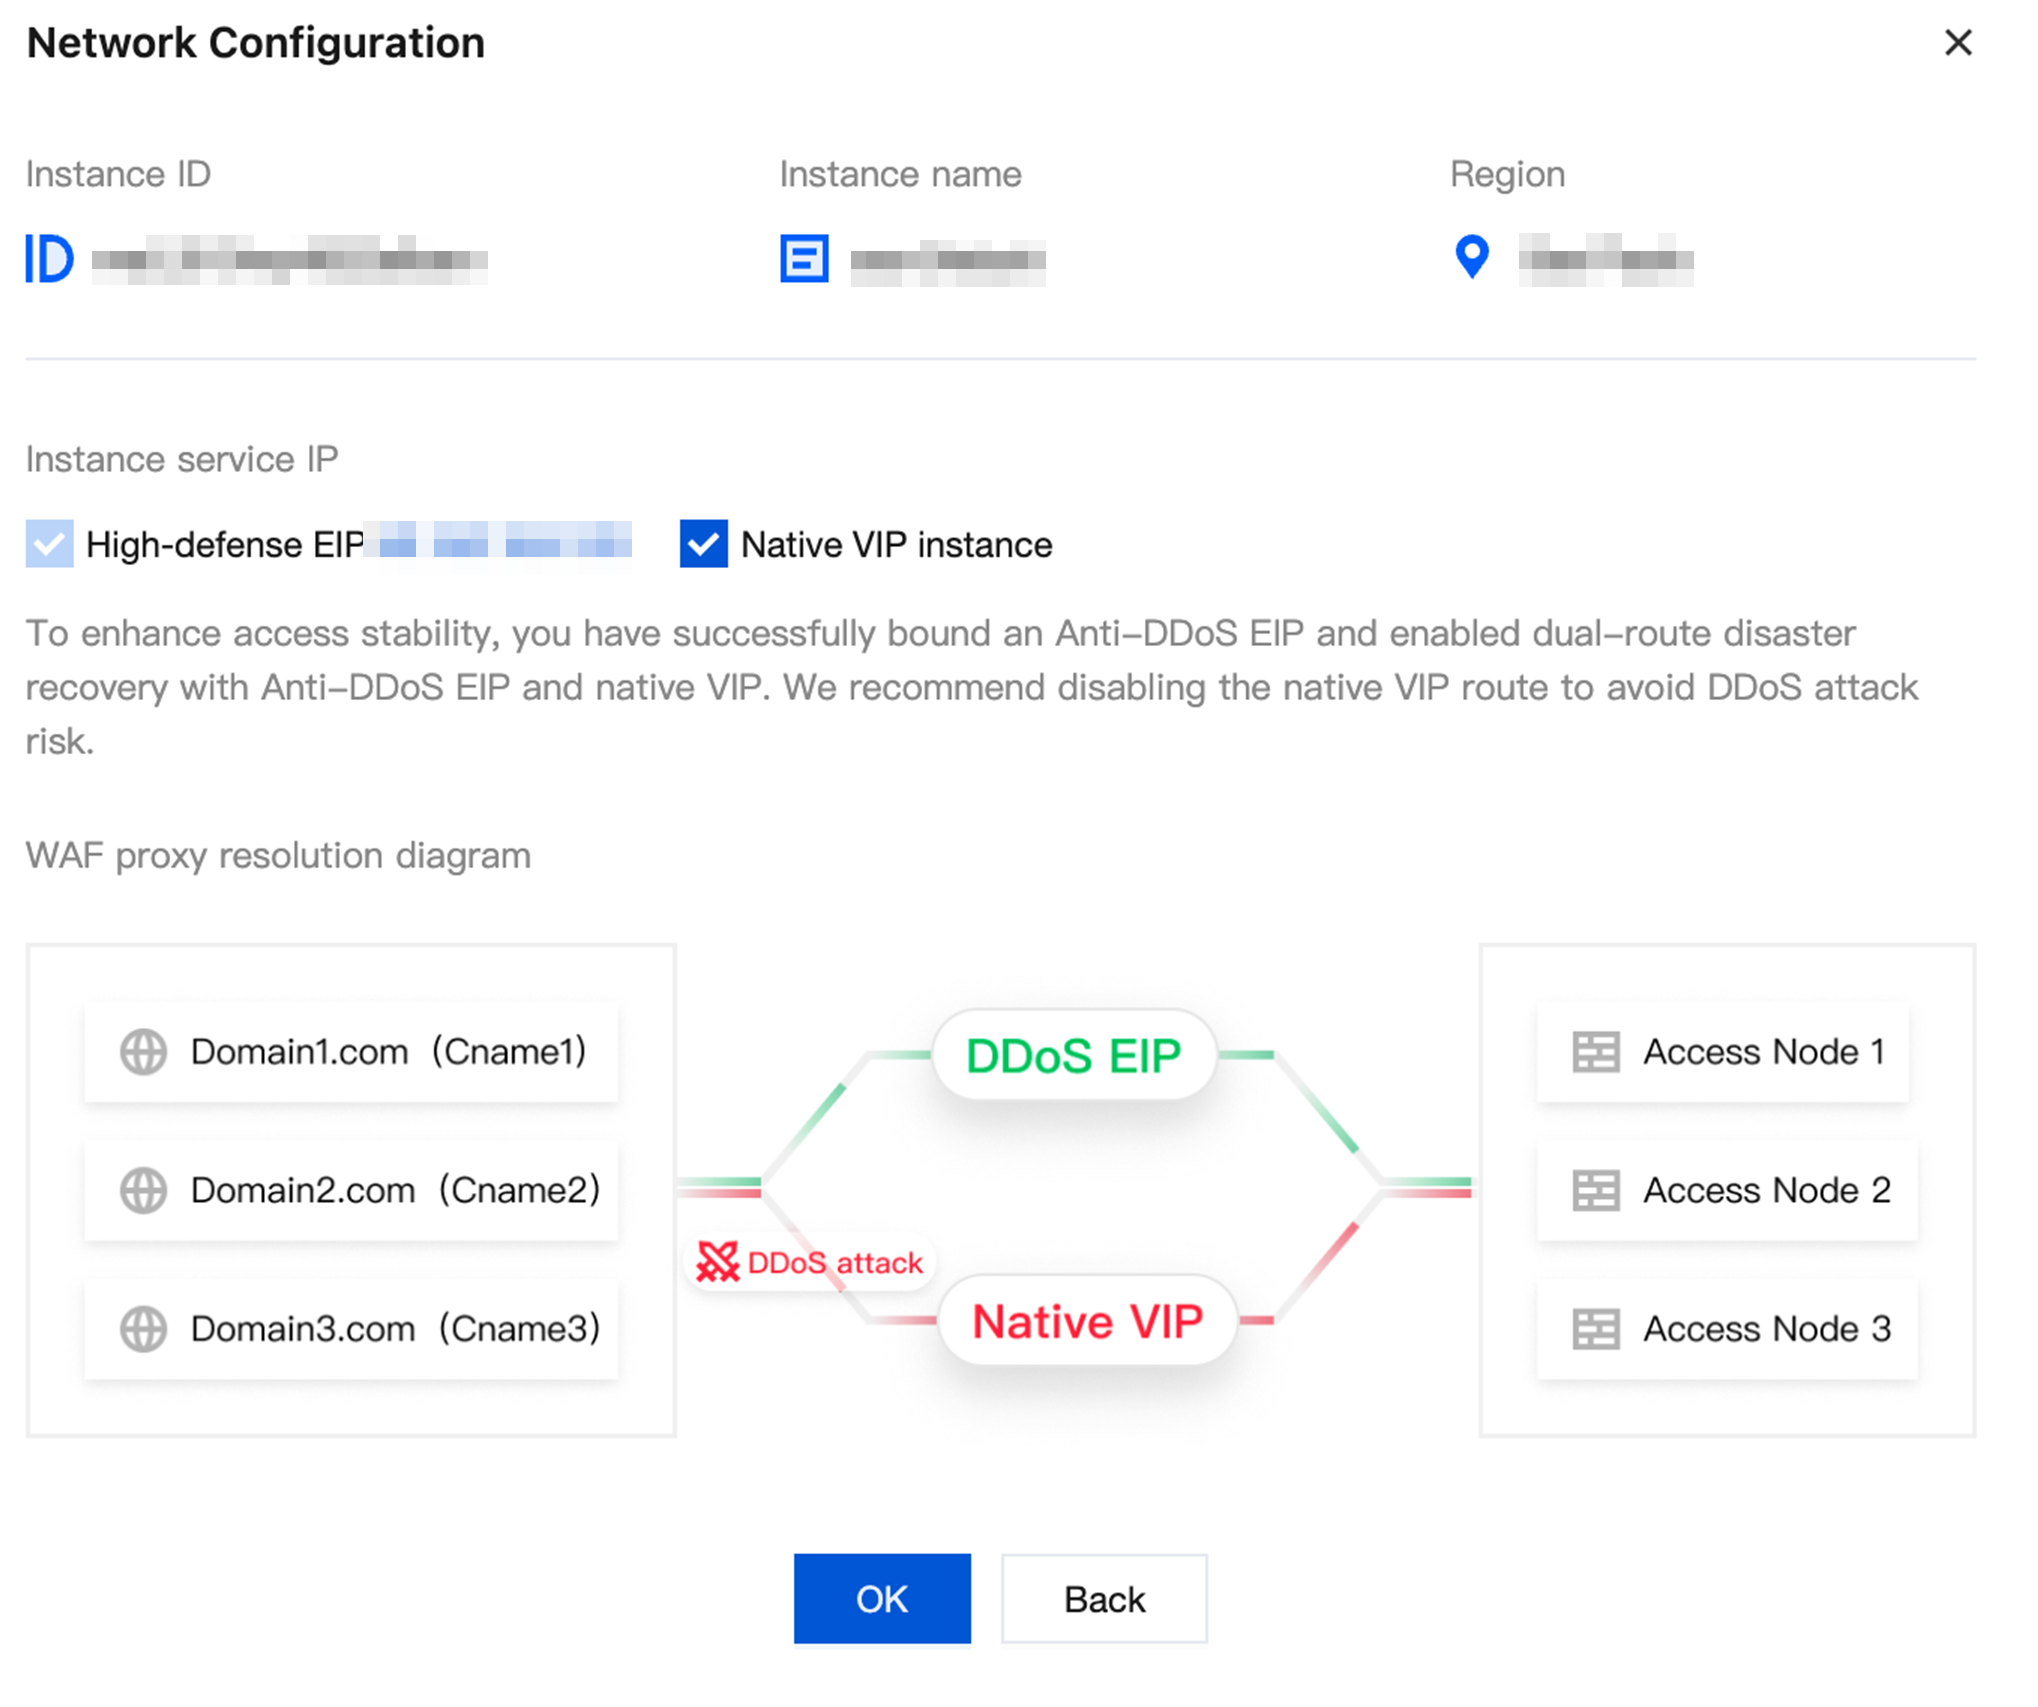
6. On the Instance Management page, you can configure the network for instances bound to an Anti-DDoS EIP.

7. Click Network Configuration. In the network configuration dialog box, WAF enables dual-line disaster recovery for Anti-DDoS EIP and native VIP by default. You can disable the native VIP line here to avoid exposure to DDoS attacks. Click OK to save.
Configuring Private Network CLB, WAF, and Anti-DDoS EIP for Coordinated Protection
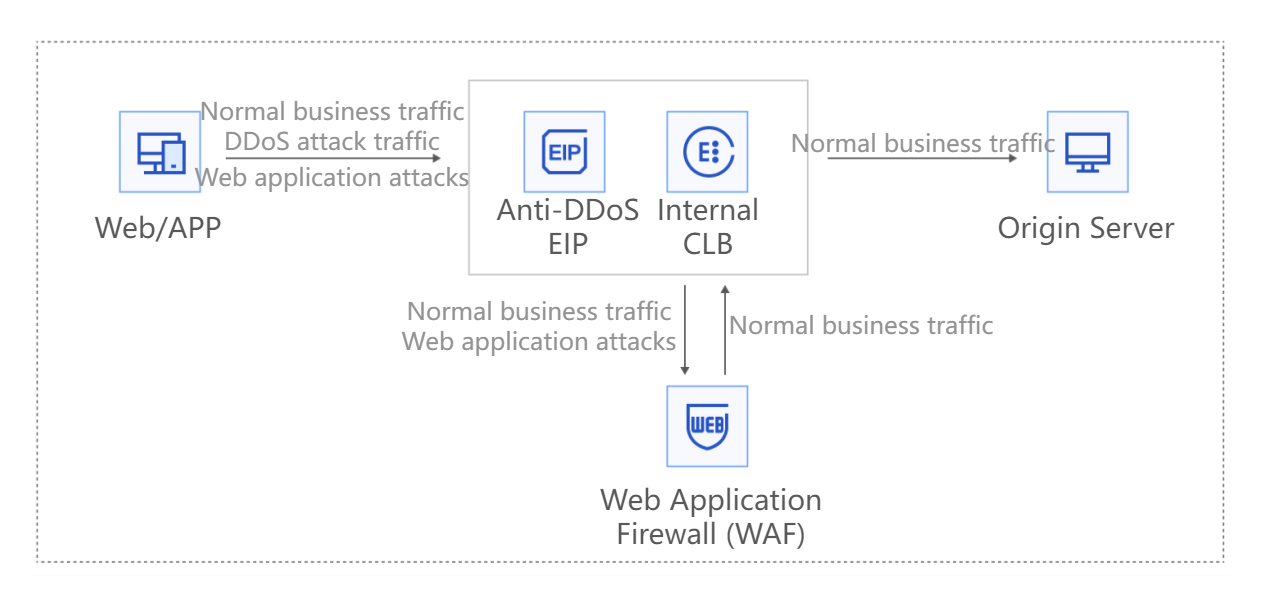
If your business is deployed based on a private network CLB and needs to connect to both Anti-DDoS EIP and WAF for protection, refer to this solution. In this mode, client traffic is first cleaned of large-scale DDoS attacks by the Anti-DDoS EIP, and the cleaned traffic is then distributed to backend servers through the private network CLB. WAF is deployed in an out-of-band mode on the private network to inspect and clean HTTP/HTTPS traffic that passes through the CLB listener.
Attention:
Before using this solution, make sure you understand the limits on binding EIPs to private network CLB instances.
Step 1: Purchasing a Private Network CLB
Step 2: Activating Anti-DDoS EIP
Go to the public IP address console to apply for an EIP and bind the purchased Enterprise Edition Anti-DDoS Pro plan. For EIP application operations, see Applying for an EIP.
Step 3: Binding Anti-DDoS EIP to a Private Network CLB Instance
1. Log in to the CLB console and click Instance Management in the left sidebar.
2. In the upper-left corner of the Instance Management page, select the region. In the instance list, select the target private network CLB instance. In the Operation column on the right, choose More > Bind EIP.
3. In the Bind EIP dialog box, select the Anti-DDoS EIP to bind, and click Submit to bind it to the private network CLB. For more operations, see Binding an EIP to a Private Network CLB Instance.
Step 4: Integrating a Private Network CLB Instance Bound with Anti-DDoS EIP into WAF
To connect a private network CLB instance that is already bound to an Anti-DDoS EIP to WAF, see Object Access.
フィードバック