Langfuse SDKを使用したCLSへのトレースデータ報告
ダウンロード
フォーカスモード
フォントサイズ
操作シナリオ
Langfuse SDKは、LLMアプリケーションにおけるリクエストチェーン、モデル呼び出し、入出力、ユーザー情報、セッション情報、所要時間、異常状態の追跡に使用できます。Langfuse SDKが生成したOpenTelemetry TraceデータをCLSに報告し、CLSで検索分析とリンク調査を行うことができます。
本文では、Langfuse SDKが生成したTraceデータをCLSに報告する方法を説明します。本文では、以下のアクセス方法を提供します:
Skillによる迅速なアクセスと分析:SkillをサポートするAIツールを使用する場合、AIが自動的にログトピックを作成または再利用し、プロジェクト言語を識別してアクセスコードを生成し、同時にレポート検証とデータ分析を完了できます。
手動設定によるアクセス:手順に従って環境変数の設定、コードのアクセス、レポート検証を完了します。
アクセス方法 | データパス | 推奨シナリオ |
OTLP/HTTP標準直接転送 | アプリケーション > 標準OTLP HTTP Exporter > CLS | 手動接続を推奨します。新規プロジェクト、迅速な試用、カスタムコードの削減、OpenTelemetry 標準セマンティクスに従って Trace を報告するシナリオに適しています。 |
説明:
本方案ではLangfuse Serverをデプロイする必要はなく、データをLangfuse Cloudに送信する必要もありません。業務コードは引き続きLangfuse SDKを使用してTraceを生成し、データの出力先はCLSに変更されます。
前提条件
接続を開始する前に、以下の準備作業が完了していることを確認してください:
CLSを有効にしました。
CLS書き込み権限を持つアクセス証明書を準備しました。例えば、CAMサブアカウント、CAM Role、または一時キーです。TencentCloud APIキー情報はAPIキー管理で取得してください。
アプリケーションはTypeScript/Node.jsまたはPythonを使用しており、Langfuse SDKをすでに導入済み、または導入予定です。
Skillによる迅速な導入と分析
Skill対応のAIツールを使用している場合は、Tencent Cloud Agent可観測性アクセスアシスタントを使用してアクセスと分析を自動的に完了できます。このSkillはアクセスと分析の機能を統合しており、ログトピックの自動作成または再利用、標準OTLP/HTTP Exporter直接転送方案の生成、Endpoint結合、Basic認証、
topic_id header、フィールドマッピング、時間単位、終了flush、検証説明の処理が可能です。また、報告データに基づくエラー診断、パフォーマンス、Tokenコスト、ユーザーセッションなどの多次元分析もサポートします。使用する前に以下の情報を準備してください:
パラメータ | 説明 |
CLS_DEFAULT_REGION | |
TENCENTCLOUD_SECRET_ID | Tencent Cloudアクセス認証情報SecretId。 |
TENCENTCLOUD_SECRET_KEY | Tencent Cloudアクセス認証情報SecretKey。 |
AIツールに以下のプロンプトを入力してください:
Tencent Cloud Agent可観測性アクセスアシスタントSkillを使用してください:https://skillhub.cn/skills/tencentcloud-cls-agent-obs現在のプロジェクトをTencent Cloud Agent可観測性に接続してください。アクセス方式:Langfuse地域:ap-guangzhou(実際の地域に置き換えてください)
手動設定による導入
ステップ1:環境変数の設定
手動でアクセスする前に、まずCLSコンソール > Agent可観測性にログインし、アプリケーションアクセスからアプリケーションを作成し、ログトピックリストで「{アプリケーション名}-trace-topic」という名前のログトピックを見つけ、そのログトピックIDをコピーしてください(下記の
CLS_TOPIC_IDに使用します)。アプリケーションプロジェクトに
.envファイルを作成または更新してください。.envが.gitignoreに追加されていることを確認し、キーの漏洩を防いでください。CLS_DEFAULT_REGION=ap-guangzhouCLS_TOPIC_ID=xxxxxxxx-xxxx-xxxx-xxxx-xxxxxxxxxxxxTENCENTCLOUD_SECRET_ID=AKIDxxxxxxxxTENCENTCLOUD_SECRET_KEY=xxxxxxxxSERVICE_NAME=my-llm-app# Pythonでは追加で必要です。Langfuse Python SDKの起動時にキーの存在が検証されるため、ここには任意の非空プレースホルダー値を入力できます。LANGFUSE_PUBLIC_KEY=pk-placeholderLANGFUSE_SECRET_KEY=sk-placeholder
説明:
OTLP/HTTP標準直接転送では
CLS_ENDPOINTを個別に設定する必要はありません。EndpointはCLS_DEFAULT_REGIONから自動的に組み立てられます。一般的なリージョンのEndpointは以下の通りです:
リージョン | パブリックエンドポイント | プライベートエンドポイント |
広州 | ap-guangzhou.cls.tencentcs.com | ap-guangzhou.cls.tencentyun.com |
上海 | ap-shanghai.cls.tencentcs.com | ap-shanghai.cls.tencentyun.com |
北京 | ap-beijing.cls.tencentcs.com | ap-beijing.cls.tencentyun.com |
シンガポール | ap-singapore.cls.tencentcs.com | ap-singapore.cls.tencentyun.com |
説明:
公网Endpointはパブリックネットワークアクセスシーンに適しています。内网Endpointは同一リージョンのVPC/CVM環境に適しており、ネットワーク遅延を低減し、パブリックネットワークトラフィックを回避できます。
ステップ2:アプリケーションの導入
手動アクセスでは標準OTLP/HTTP Exporterを使用してTraceをCLSに報告します。カスタムエクスポートコードを作成する必要はありません。プロジェクトの言語に応じてTypeScript/Node.jsまたはPythonの例を選択してアクセスを完了してください。
説明:
言語ごとにOpenTelemetry SDKのEndpointパラメータに対する要件は異なります。本文のTypeScript/Node.jsおよびPythonの例では、完全なOTLP Trace URLを使用します。つまり、
https://{CLS_DEFAULT_REGION}.cls.tencentcs.com/v1/tracesです。1. 依存関係をインストールします。
npm install @langfuse/tracing @langfuse/otel @langfuse/openai \\@opentelemetry/sdk-node \\@opentelemetry/exporter-trace-otlp-http \\dotenv
2.
instrumentation.tsを作成します。import "dotenv/config";import { NodeSDK } from "@opentelemetry/sdk-node";import { OTLPTraceExporter } from "@opentelemetry/exporter-trace-otlp-http";import { LangfuseSpanProcessor } from "@langfuse/otel";const secretId = process.env.TENCENTCLOUD_SECRET_ID!;const secretKey = process.env.TENCENTCLOUD_SECRET_KEY!;const region = process.env.CLS_DEFAULT_REGION!;const topicId = process.env.CLS_TOPIC_ID!;const auth = Buffer.from(`${secretId}:${secretKey}`).toString("base64");export const sdk = new NodeSDK({spanProcessors: [new LangfuseSpanProcessor({exporter: new OTLPTraceExporter({url: `https://${region}.cls.tencentcs.com/v1/traces`,headers: {Authorization: `Basic ${auth}`,topic_id: topicId,},}),flushAt: 512,flushInterval: 5000,}),],});sdk.start();process.on("SIGTERM", async () => {await sdk.shutdown();});
3. ビジネスエントリファイルの先頭で
instrumentation.tsを読み込んでください。この読み込みが、OpenAIやLangChainなどinstrumentation patchの対象となるモジュールよりも前に行われるようにしてください。import { sdk } from "./instrumentation";import OpenAI from "openai";import { observeOpenAI } from "@langfuse/openai";import { startActiveObservation, propagateAttributes } from "@langfuse/tracing";const openai = observeOpenAI(new OpenAI());async function chat(userMessage: string) {return startActiveObservation("chat", async (span) => {span.update({ input: [{ role: "user", content: userMessage }] });return propagateAttributes({ userId: "u-123", sessionId: "s-456", tags: ["model:gpt-4o"] },async () => {const res = await openai.chat.completions.create({model: "gpt-4o",messages: [{ role: "user", content: userMessage }],});span.update({ output: res.choices[0].message });return res;},);});}await chat("您好");await sdk.shutdown();
1. 依存関係をインストールします。
pip install langfuse opentelemetry-sdk opentelemetry-exporter-otlp python-dotenv
2.
instrumentation.pyを作成します。このファイルは、任意のlangfuseモジュールをインポートする前にインポートする必要があります。import osimport base64from dotenv import load_dotenvfrom opentelemetry import tracefrom opentelemetry.sdk.resources import Resourcefrom opentelemetry.sdk.trace import TracerProviderfrom opentelemetry.sdk.trace.export import BatchSpanProcessorfrom opentelemetry.exporter.otlp.proto.http.trace_exporter import OTLPSpanExporterload_dotenv()secret_id = os.environ["TENCENTCLOUD_SECRET_ID"]secret_key = os.environ["TENCENTCLOUD_SECRET_KEY"]region = os.environ["CLS_DEFAULT_REGION"]topic_id = os.environ["CLS_TOPIC_ID"]auth = base64.b64encode(f"{secret_id}:{secret_key}".encode()).decode()provider = TracerProvider(resource=Resource.create({"service.name": os.environ.get("SERVICE_NAME", "my-llm-app")}))provider.add_span_processor(BatchSpanProcessor(OTLPSpanExporter(endpoint=f"https://{region}.cls.tencentcs.com/v1/traces",headers={"Authorization": f"Basic {auth}","topic_id": topic_id,},),max_export_batch_size=512,schedule_delay_millis=5000,))trace.set_tracer_provider(provider)
3. ビジネスエントリに
instrumentation.pyを導入してください。import instrumentationfrom langfuse import observe, propagate_attributes, get_clientfrom langfuse.openai import openai@observe(name="chat", as_type="generation")def chat(user_message: str):with propagate_attributes(user_id="u-123", session_id="s-456", tags=["model:gpt-4o"]):return openai.chat.completions.create(model="gpt-4o",messages=[{"role": "user", "content": user_message}],)if __name__ == "__main__":chat("您好")get_client().flush()
応用設定
サンプリング設定:
TracerProviderでサンプリングポリシーを設定し、CLSに報告するTraceデータ量を制御できます。サンプラー | 説明 | 適用シナリオ |
ALWAYS_ON | 全量サンプリング | テスト環境または低トラフィック環境です。 |
ALWAYS_OFF | すべてサンプリングしません。 | 一時的にTraceを無効にします。 |
TraceIdRatioBased(0.1) | 比率ベースで10%サンプリングします。 | 本番環境で書き込み量を制御します。 |
ParentBased(root) | 親Spanに基づいてサンプリングするかどうかを決定します。 | 分散トレース環境において、トレース全体でサンプリングの一貫性を確保します。 |
1. 依存関係を追加でインストールします。
npm install @opentelemetry/sdk-trace-base
2. instrumentation.tsでサンプラーを設定します。
import {ParentBasedSampler,TraceIdRatioBasedSampler,} from "@opentelemetry/sdk-trace-base";export const sdk = new NodeSDK({sampler: new ParentBasedSampler({root: new TraceIdRatioBasedSampler(0.1),}),// 他の設定は変更しません。});
instrumentation.pyでサンプラーを設定します。
from opentelemetry.sdk.trace.sampling import ParentBased, TraceIdRatioBasedprovider = TracerProvider(sampler=ParentBased(TraceIdRatioBased(0.1)),resource=Resource.create({"service.name": os.environ.get("SERVICE_NAME", "my-llm-app")}))
クロスリージョン報告:報告リンクがクロスリージョンである必要がある場合、OTLPリクエストHeaderにソースリージョン識別子を追加できます。
new OTLPTraceExporter({url: `https://${region}.cls.tencentcs.com/v1/traces`,headers: {Authorization: `Basic ${auth}`,topic_id: topicId,"x-cross-region": "ap-guangzhou", // ソースリージョン識別子},})
OTLPSpanExporter(endpoint=f"https://{region}.cls.tencentcs.com/v1/traces",headers={"Authorization": f"Basic {auth}","topic_id": topic_id,"x-cross-region": "ap-guangzhou", # ソースリージョン識別子},)
HTTPSを無効にします(テスト環境のみ)。
http://プロトコルのURLを渡して平文HTTPを使用できます。
url: `http://${region}.cls.tencentcs.com/v1/traces`,
insecure=Trueパラメータを使用できます。
OTLPSpanExporter(endpoint=f"http://{region}.cls.tencentcs.com/v1/traces",insecure=True, # テスト環境のみ# ...)
ステップ3:報告結果の検証
アクセスの完了後、アプリケーションでLLM呼び出しを1回トリガーし、その後CLSコンソールでTraceデータをクエリします。
1. CLSコンソールにログインし、左側のナビゲーションバーで検索分析を選択します。
2. Traceデータを保存するためのログトピックを選択します。
3. 検索ボックスに以下のステートメントを入力して、最新に報告されたTraceデータを照会します。
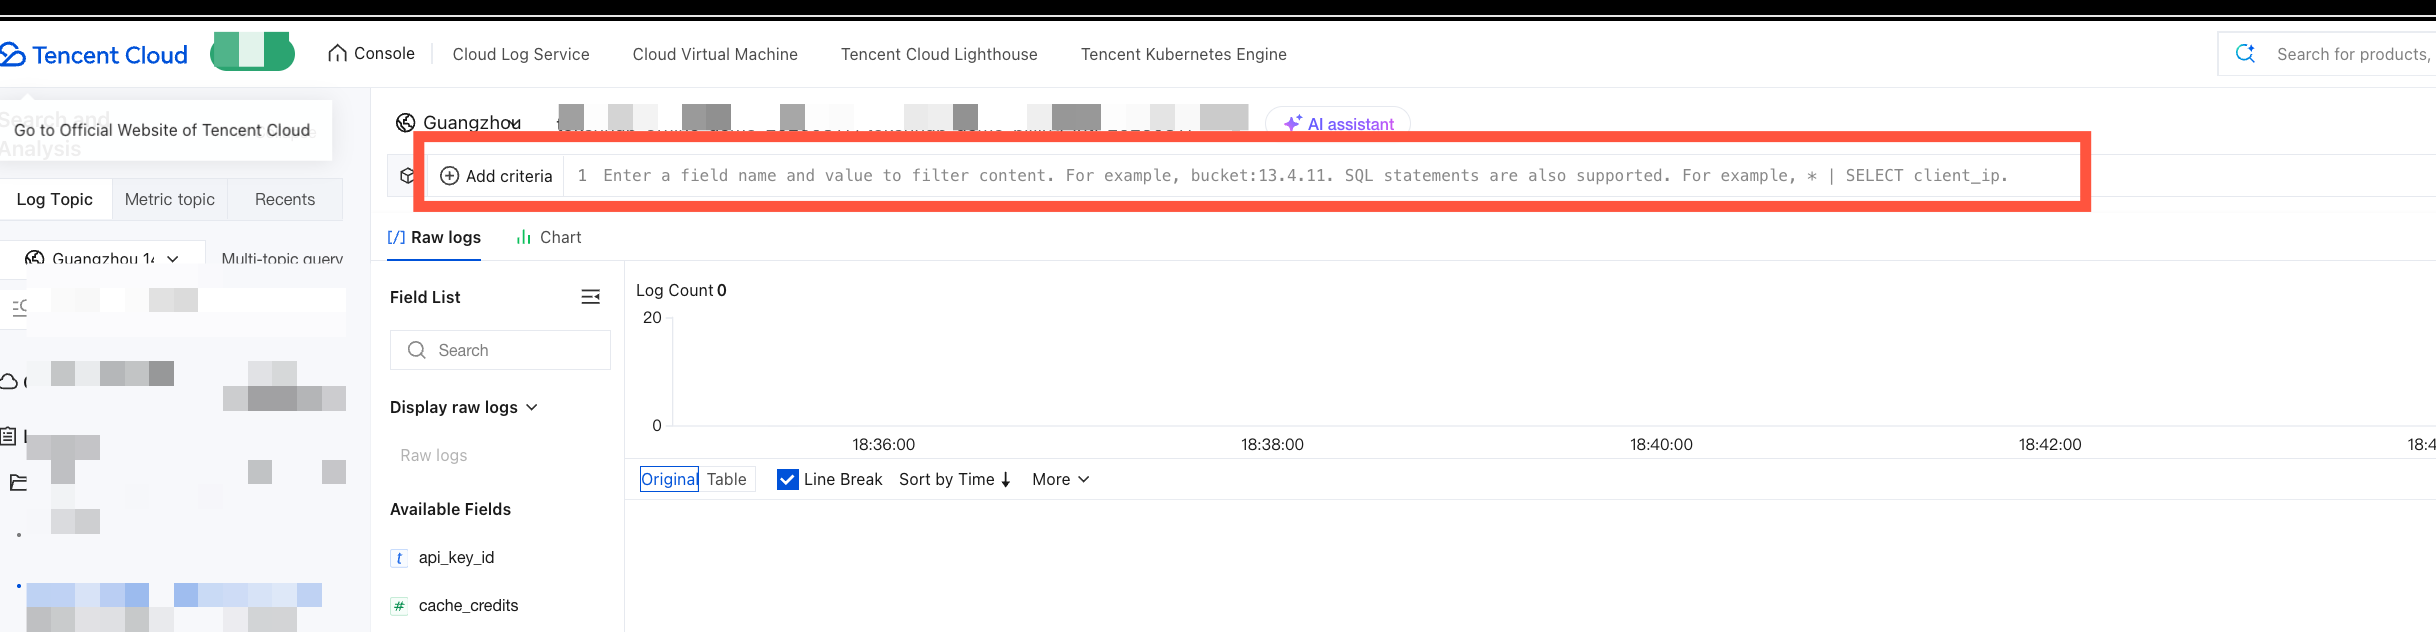
* | SELECT traceID, spanID, name, duration, statusCode ORDER BY __TIMESTAMP__ DESC LIMIT 10
指定した呼び出しチェーンを照会することもできます:
traceID:"4bf92f3577b34da6a3ce929d0e0e4736"
モデルごとに平均処理時間を集計する場合は、モデルフィールドが
attributeに書き込まれ、インデックスが設定されているか、またはJSON抽出関数を使用していることを確認してください:* | SELECT json_extract_scalar(attribute,'$."gen_ai.request.model"') AS model,AVG(duration) AS avg_duration_nsGROUP BY model
フィールド説明
OTLP/HTTP標準直接転送を使用する場合、
resource、scope、spanなどの情報はOpenTelemetry標準プロトコル構造に従ってCLSに報告されます。報告後、OTel SpanフィールドとCLSにおける対応関係は以下の通りです。検索と分析に役立ちます:
OTel Span フィールド | CLS LogItem Key | 説明 |
traceId | traceID | Trace ID、hex文字列。 |
spanId | spanID | Span ID、hex文字列。 |
parentSpanId | parentSpanID | 親Span ID。ルートSpanは空です。 |
span.name | name | Span名。 |
SpanKind | kind | Spanタイプ。 |
startTime | start | Span開始時間、ナノ秒。 |
endTime | end | Span終了時間、ナノ秒。 |
endTime - startTime | duration | Span処理時間、ナノ秒。 |
status.code | statusCode | Spanステータスコード。 |
status.message | statusMessage | Spanステータス説明。 |
attributes | attribute | Span attributes、JSON文字列。 |
resource.attributes | resource | Resource attributes、JSON文字列。 |
events / links | logs / links | 任意です。Span EventsまたはLinksを保持する必要がある場合は、JSON文字列にシリアル化して書き込むことができます。 |
注意事項
start、end、durationフィールドはナノ秒単位を維持する必要があります。これらのフィールドを1000で割ってマイクロ秒に変換しないでください。そうしないと、処理時間は実際の値の1000分の1として表示されます。短いライフサイクルのスクリプトが終了する前に
flush()またはshutdown()を実行し、最後の一批のSpanが未報告のままになるのを防ぐ必要があります。アクセス証明書は環境変数またはキー管理ツールを通じて注入してください。コードにハードコーディングしないでください。
フィードバック